|
REGULAR TABLES OR TABLEBASED GRIDS?
GoLive has two methods to create tables:
– regular tables with columns, rows and cells
– tablebased grids
Table-purists recommend that you build tables the way you do in MS Word and Adobe InDesign and other applications, that is, regular tables with columns, rows and cells, where you have a strict system of squares which makes up the structure of the table.
People used to page-layout applications normally love GoLives tablebased grid for the creation of tables as that gives more freedom for how to place text and images by simply dragging them onto the grid and freely moving them around. The result, code-wise, is a regular table though, and the browsers do not see any difference between these two methods. (And neither does anybody else if you on upload of the pages strip the GoLive-specific code from the uploaded pages).
The regular table
 To insert a table on a page, in the Tools palette where the basic tools are, use the rightmost button in the second row. To insert a table on a page, in the Tools palette where the basic tools are, use the rightmost button in the second row.
You can either drag and drop a table onto the page with that tool, or doubleclick it, and a table will be inserted in the page where your cursor is placed. The default number of rows is one, and the default number of columns is three. The default table also always has a 1 pixel large border and some padding.
You can have multiple tables on a place, under each other, but you cannot place them on the same row. You can also nest tables, that is insert other tables inside an already existing table in a tablecell.
How many rows and columns that will be created for your table depends on how many rows and columns your last created table had. GoLive uses the last used settings for the next table.
If you want to decide how many rows and columns a table has already when you create it, CMD+click (Mac) and hold on the tabletool and drag out to the right until you get the desired number of rows and columns. When you let go of the mouse a table with that number of rows and columns will be inserted in the page where your cursor is placed.
The number of rows and columns and their sizes can be changed after the table is created.
The table inspector
You use the context-sensitive Inspector palette to set values for your table. The Inspector changes content depending on what you have selected in the table.
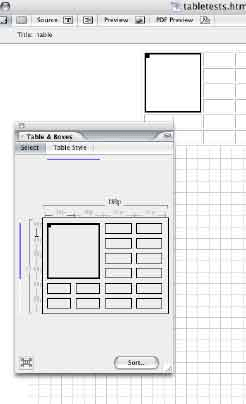
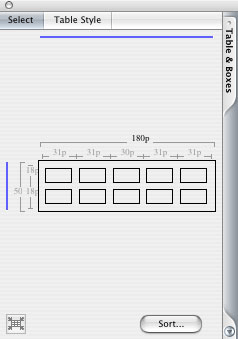
The tricky part of tables is to set good values and values that add up. If the values do not add up to the total dimensions of the table as a whole, you will get very unexpected results and the table might not look one bit the way you intended it to look. One recommendation is to not mix different sorts of values in the same table. You CAN do that, but then again, values have to add up. To check if the values add up, open the Tables & Boxes palette (shown here to the right – in GoLive CS it is only called Table). If something doesn't add up, it will show that in red. You can also click in the Tables & Boxes palette to adjust the value that is not as it ought to be. Note that this sometimes can lead to other changes in the table and you might have to do this several times at different places, in combination with manually changing values in the Inspector until you get what you want.
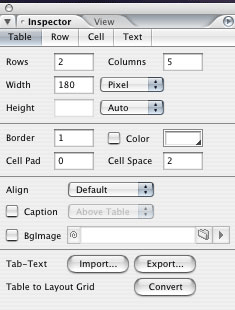
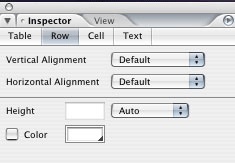
The Inspector for the table as a whole when the whole table is selected. Here you set the overall dimensions of your table and if it shall have a border or not, color, padding and spacing between cells. You also set the Alignment of the table here.
Note the buttons at the bottom of the Inspector. Here you can import and export tab-separated text and use that for the content or export it for use in another application. Also note the button for conversion of a regular table to a Layout grid.
Note that if you want to later format the table with CSS you have to set all the values for Border, Cell Pad and Cell space to 0. It is not enough to empty the fields. If you also want to give the table color by CSS you should NOT set any color here.
The Inspector for a table row when a row is selected. Not many choices, but they are self-explanatory.
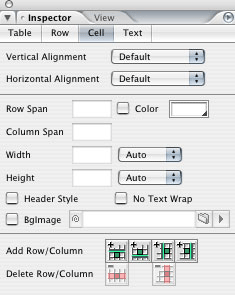
The Inspector for a tablecell when a cell, or a couple of cells is/are selected. You use rowspan and/or columnspan when you want to combine one cell with a number of other cells either on the row or in a column to make them appear as one cell. To be able to do that, you can only have one cell selected.
This is also the place where you can add and delete rows and columns. Also here you must have only one cell selected to delete a row or a column on either side of the selected cell. If you select a whole row or a whole column these buttons are inactive. You CAN delete them though by using the regular return key on the keyboard.
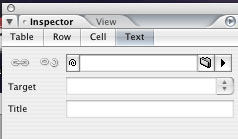
The Inspector for text in a tablecell. Use it if you want to make links from the text.
To align a table on the page, place the cursor outside the table, in the paragraph that the table lives in, and use the alignment buttons in the toolbar to center it or align it to right or left. The default is left.
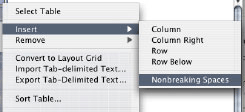
NOTE: A tablecell must have some content – not necessarily visible content – to make the cell visible in a browser. Adding color to the cell is not enough. Normally you insert a nonbreaking space into the cell to make it visible. The easiest way to do that is to control-click (Mac) on the cell and choose Insert, Nonbreaking Spaces from the context-sensitive menu that appears.
|
To edit a regular table
The number of rows and columns and their sizes can be changed after the table is created.
To edit a regular table you first have to select it. What you select depends on what you want to work with, the table as a whole, a cell or a row.
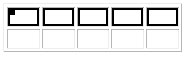
A selected table. To select the whole table click on its outer border.
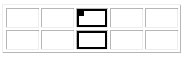
A selected column. To select a column, click slightly above the column when the cursor turns into a downward arrow.
A selected row. To select a row, click slightly to the left of the row when the cursor turns into a rightpointing arrow.
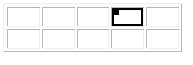
A selected cell. To select a cell, click on the edge of the cell. If you click inside the cell, you will instead insert your cursor and can start typing or inserting content into the cell.
If you want to select just some of the cells, click and drag over the desired cells. They can be both in columns and rows.
Merging cells
To combine one or more cells with each other to give the impression of them being one, single cell, is called merging. To merge cells you select ONE cell and then use the Inspector to type the number for how many rows and/or columns the cell should span. You cannot merge cells with adjacent cells that have content, they need to be empty.
If you have trouble selecting what you want, bring out the Tables & Boxes palette and use that for selecting by clicking either a column, a row or a cell or at the upper lefthand corner for the whole table.
In the Tables & Boxes palette, note the button Sort... at the bottom of the palette. If you select your table and click on that button you can sort the content in your table with these choices:
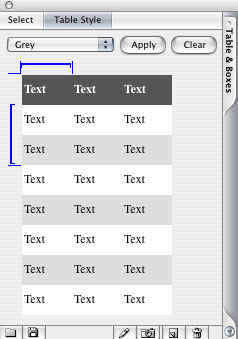
The second tab in the Tables & Boxes palette is Table Style.
You can use Table Style to format your table with some pre-styled choices or to build your own table-styles.
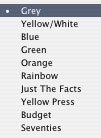
The pre-styled choices are:
Test them to see how they look.
The buttons at the bottom of the Table Style palette are:
– import table style
– export table style
– edit table style
– grab table style
– new table style
– delete table style
You also get those choices by using the flyoutmenu of the Tables & Boxes palette (click on the little arrow in the palette):
|
|
The tablebased grid in GoLive CS and CS2
 An alternative to the regular table is to use the tablebased grid in GoLive CS and CS2. The PROs for the grid is the relative freedom of how you can place text- and imageobjects on it. The CONs are that it produces a lot of code and a lot of spacers and extra cells and rows. An alternative to the regular table is to use the tablebased grid in GoLive CS and CS2. The PROs for the grid is the relative freedom of how you can place text- and imageobjects on it. The CONs are that it produces a lot of code and a lot of spacers and extra cells and rows.
To insert a tablebased grid, either drag a Layout grid object from Tools to the page, or doubleclick it. A default sized Layout grid will be inserted with readymade helplines at specific intervals.
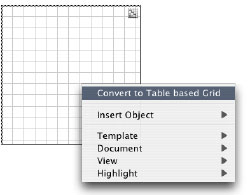
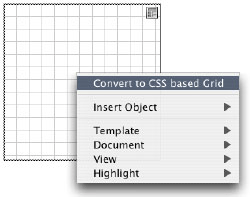
If you use GoLive CS it is a tablebased layout grid right away. If you use GoLive CS2 it is a CSS based layout grid. You can convert that to a tablebased layout grid by ctrl+clicking the grid (Mac).
In GoLive CS2 the two grids are differed between by the icon in the upper righthand corner of the grid. The CSS-based grid has a CSS icon, the tablebased grid has a table-icon.
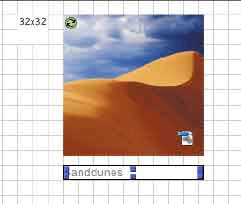
To add objects to the layoutgrid you simply drag and drop textobjects and imageobjects to the grid. The default size of those are always 32x32 pixels. They will grow though with the size of the content you put into them.
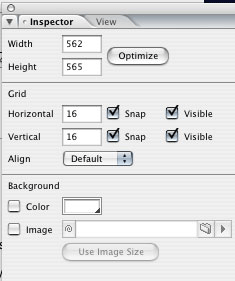
The size of the grid and some other things you set in the Inspector. You can also change the size of the grid by simply dragging its edges. The size of the grid also has a tendency to grow – but not shrink – when you add objects to it. Sometimes it grows a lot... particularly in length but I've also seen it get real big in width if you don't watch up when you move objects around on the grid.
So, do not forget to click the button Optimize in the Inspector for the grid. That will delete all unoccupied space on the grid and shrink it as much as is possible.
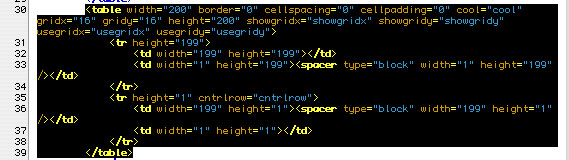
The tablebased grid inserts a lot of extra cells, merged cells and spacers to be able to create a table in accordance to how you have placed your text- and imageobjects on the grid. Converting a grid back to a regular table is possible (Special menu, Layoutgrid to table in GoLive CS), but be prepared for a lot of unexpected extra cells and spacers if you do. And a lot of painful cleaning up to get it to look reasonably right. I do not recommend it, even if it is possible. If you use GoLive CS2 you can instead convert it to a CSS-based grid – a much better choice.
|
The CSS based grid when ctrl+clicked.
The tablebased grid.
The Inspector when a grid is selected.
|